FormIt Help
Use this help file to
learn about the features of FormIt. FormIt is
divided into five screens comprised of:
|
1. |
|
|
|
2. |
|
|
|
3. |
|
|
|
4. |
|
|
|
5. |
|
These screens can be
accessed at any time using the tab buttons at the bottom.
General
FormIt
was designed to allow a single-paged worksheet or template to be filled in
electronically through the use of various tools located across the various
screens.
The colors
used in the various FormIt screens were selected so
as to not overly stimulate children and help them focus.
The Gallery
view presents the various projects that have been worked on using FormIt. Saved
projects are listed here and this view can be scrolled to show the complete
listing of documents. The listing
shows the preview image for each document so that you can easily find the one
you’re interested in. The status
bar at the bottom presents the number of documents available.
The Gallery
toolbar allows the following functions:
|
1. |
|
Create new FormIt file |
|
2. |
|
Open the selected FormIt file |
|
3. |
|
Rename the selected file |
|
4. |
|
Copy the selected file |
|
5. |
|
Delete the selected file |
To select a document you
just tap it. Once tapped, a preview
of the document will be shown on the right side of the screen along with some
details about it. Only one document
can be selected at any one time. If
you tap another document, it becomes the current selection. If you tap on another portion of the
Gallery screen, it de-selects all documents.
If you tap on the
document twice, it opens the document and takes you automatically to the ‘Edit’
screen. The other way to open a
file would be to select it and then tap the ‘Open’ toolbar button.
To start a new document just tap the ‘New’ toolbar button. This will start a new FormIt document without any background image. You will then be taken to the ‘Edit’
screen. At any time you can tap on
the ‘Capture’ tab button at the bottom to add a background image to the
document. You should do this at the
start of editing so that you align added objects properly.
The capture view allows
a background image to be selected for your FormIt
document. There are a number
of ways you can choose a background image.
|
1. |
|
You can select an image from pictures you have already taken. You can also save images from emails
and bring them into FormIt this way. |
|
2. |
|
You can take a picture of a document using the iPad’s
camera and bring it into FormIt directly. |
|
3. |
|
You can open a PDF document into FormIt
directly from an email. Hold down
the attachment in your email and select the FormIt
App icon to open it. |
Once you have selected a
background image, FormIt previews it in the capture
screen. If you have taken a picture
using the iPad’s camera you can save the picture to
the Camera Roll using:
![]()
To use the preview image
as a background for your FormIt document you must tap
the ‘Use Image’ toolbar button: ![]()
The Edit view allows you
to add objects to your FormIt document including:
· Adding text
· Drawing shapes
· Adding pictures
· Selecting a portion of the document and making an
image
· Adding a date
· Inserting symbols: üor X
Once an object is added,
the function needs to be selected again to add another object.
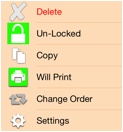
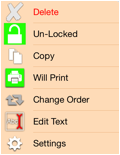
Once you insert an
object, you can select it by tapping it once. A blue selection box will appear. Once selected, it can be moved around in
the document. Tapping on the
selection box brings up a context menu giving you other options to manipulate
for that specific type of object.
Depending on the object selected the menu items will be different.
Objects can be re-sized
by touching the object selection box near the blue outer frame. When the object is re-sizing, the
selection box will turn to green.
You can select each side of the selection box, one by one, to re-size
the object. However, if the object
is locked it cannot be moved or re-sized.
A locked object has a yellow selection frame when tapped.
Types of object
selection frames:
|
|
|
|
|
Object Selected & Object Unlocked |
Object Selected & Object is being Resized |
Object Selected & Object Locked |


To have the context menu
disappear, touch somewhere else on the screen.
Reading Text ![]()
FormIt also allows you
to select text which can be read to you. You can select a text box and then tap
the Read button and FormIt will read the contents of
the text box to you. Alternatively,
you can tap the Read button, highlight a section of
your FormIt document and FormIt
will read it to you. What FormIt does in this case is to take what you have selected,
convert it to an image, convert that image to text and then read the text to
you. How good FormIt
reads will depend on how good the background image is. Currently, FormIt
only understands and reads in English.
Adding Text ![]()
Text can be added from
the ‘Text’ tool button.
Two types of text
objects can be added:
1.
Text Field: Allows a single line of text
2.
Text Box: Allows multiple lines of text to be
added
A text field can be
added by tapping where you want it inserted. A text box can be added in the same way
or you can ‘draw’ where you would like it placed.
Drawing Shapes ![]()
The following shapes can
be drawn on the screen: line,
rectangle, circle and scribble.
After you select the type of object you would like to draw, draw it on
the screen with your finger.
Adding Pictures ![]()
Pictures can be added to
the worksheet in two ways:
1.
A picture can be
added from the Camera Roll from pictures already taken
2.
A portion of
your worksheet can be selected and converted to a picture
which is added to your worksheet.
This tool can be used to cut the portion of a graphical pattern which repeats, for example.
Inserting Symbols ![]()
The following can be
inserted into a worksheet:
1.
The name of the
user. The user name can be set in
the settings screen. The name
entered is only stored locally for FormIt’s use.
2.
The current
date.
3.
A check mark
symbol.
4.
An ‘X’ symbol.
The Share view allows
the open FormIt document to be shared, saved as an
image or sent to a printer.
The preview image shows
how the current worksheet will look when printed or saved as an image. If the Edit View orientation is in
portrait then the final document will be in portrait and vice versa.
The following tools are
available in the share screen:
1.
Transfer –
You can transfer the FormIt worksheet or native
document using a number of different techniques: AirDrop,
Email, Camera Roll, etc.
2.
Email
3.
Send to Camera
Roll
4.
Print to an AirPrint printer.
Settings View
The Settings view allows the user to customize preferences for FormIt tools as well as providing access
to useful informational links for children and parents.
Importing Files
You can import a FormIt document file (‘FI’) sent to you through email by
tapping on the email attachment and selecting the FormIt
App icon ![]() .
.